39 KiB
| title | date | author | tags | categories | ||
|---|---|---|---|---|---|---|
| MongoDB 分片集群 | 2021-01-10 | ac |
|
|
MongoDB的分片集群:概念、优点、操作、分片策略、故障转移
分片集群(Sharded Cluster)
1.分片概念
分片(sharing)是一种跨多台机器分布数据的方法,MongoDB使用分片来支持具有非常大的数据集和高吞吐量操作的部署。
换句话说,分片(sharing)是将数据拆分,将其分散存在不同的机器上的过程。有时也用分区(partition)来表示这个概念。将数据分散到不同的机器上,不需要性能强大大型计算机就可以实现存储更多的数据,处理更多的负载。
具有大型数据集或高吞吐量应用程序的数据库系统可以会挑战单个服务器容量。例如,高查询率会耗尽服务器的CPU容量。工作集大小大于系统的RAM会强调磁盘驱动器的I/O容量。
有两种解决系统增长的方法:垂直扩展和水平扩展。
垂直扩展意味着增加单个服务器的容量,例如使用强大的CPU,添加更多RAM或增加存储空间容量。基于云的提供商和基于可用的硬件配置具有硬性上线,即垂直扩展有实际的最大值。
水平扩展是划分系统数据集并加载多个服务器,添加其他服务器以根据需要增加容量。虽然单个机器的总体速度或容量可能不高,但每台机器都是处理整个工作负载的子集,可能提供比单个高速大容量服务器更高的效率。扩展部署容量只需要根据需要添加额外的服务器,这可能比单个机器的高端硬件的总体成本更低。权衡基础架构和不熟维护的复杂性增加。
MongoDB支持通过分片进行水平扩展。
2.集群组件
MongoDB分片集群包含以下组件:
- 分片(存储):每个分片包含分片数据的子集。每个分片都可以部署为副本集。
mongos(路由):mongos充当查询路由器,在客户端应用程序和分片集群之间提供接口。config servers("调度"的配置):配置服务器储存集群的源数据和配置设置。
MongoDB在集合级别对数据进行分片,将集合数据分布在集群中的分片上。
3.示例
构建分片集群架构目标:
两个分片节点副本集(3+3)+ 一个配置节点副本集(3)+两个路由节点(2),共11个服务节点。
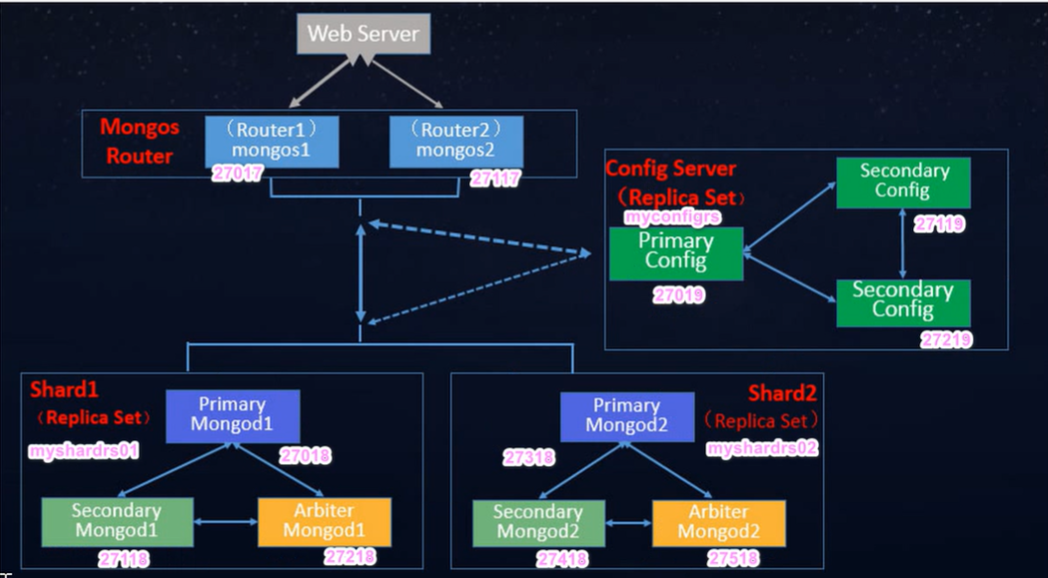
多个路由可以容灾,其是相互独立的。
分片角色:分片集群的副本集(一主一副一仲裁)
分片服务采用副本集的方式搭建(Shard1、Shard2),配置仲裁节点是可以节约机器资源。
创建分片副本集
第一个分片副本集Shard1
准备存放数据和日志的目录:
qiusj@u20:~$ mkdir -p /home/qiusj/.local/mongodb/sharded_cluster/myshardrs01_27018/log
qiusj@u20:~$ mkdir -p /home/qiusj/.local/mongodb/sharded_cluster/myshardrs01_27018/data/db
qiusj@u20:~$ mkdir -p /home/qiusj/.local/mongodb/sharded_cluster/myshardrs01_27118/log
qiusj@u20:~$ mkdir -p /home/qiusj/.local/mongodb/sharded_cluster/myshardrs01_27118/data/db
qiusj@u20:~$ mkdir -p /home/qiusj/.local/mongodb/sharded_cluster/myshardrs01_27218/log
qiusj@u20:~$ mkdir -p /home/qiusj/.local/mongodb/sharded_cluster/myshardrs01_27218/data/db
Shard1-节点1:新建或修改配置文件:
vim /home/qiusj/.local/mongodb/sharded_cluster/myshardrs01_27018/mongod.conf
myshardrs_27018:
systemLog:
   # MongoDB发送所有日志输出的目标指定为文件
   destination: file
   path: "/home/qiusj/.local/mongodb/sharded_cluster/myshardrs01_27018/log/mongod.log"
   logAppend: true
storage:
   #mongod实例存储其数据目录,storage.dbPath设置仅适用于mongod
   dbPath: "/home/qiusj/.local/mongodb/sharded_cluster/myshardrs01_27018/data/db"
   journal:
      #启用或禁用持久性日志以确保数据文件保持有效和可恢复
      enabled: true
net:
   # 服务实例绑定所有IP,有副作用,副本集初始化的时候,节点名字会自动设置为本地域名而不是ip
   # bindIpAll: true
   #添加本机在局域网内的ip,如果是云服务器,也是云服务器所在的局域网ip,不是公网ip
   bindIp: 127.0.0.1,192.168.0.152
   port: 27018
setParameter:
   enableLocalhostAuthBypass: false
processManagement:
   #启动在后台运行mongos或mongod进程的守护进程模式
   fork: true
   #指定用于保存mongos或mongod进程的进程ID的文件位置,其中mongos或mongod将写入其PID
   pidFilePath: "/home/qiusj/.local/mongodb/sharded_cluster/myshardrs01_27018/log/mongod.pid"
replication:
   #副本集名称
   replSetName: myshardrs01
sharding:
   #分片角色
   clusterRole: shardsvr
分片角色:
| Value | Description |
|---|---|
configsvr |
Start this instance as a config server.The instance starts on port 27019 by default. |
shardsvr |
Start this instance as a shard.The instance starts on port 27018 by default. |
设置sharding.clusterRole需要mongod实例运行复制。要将实例部署为副本集成员,请使用replSetName设置并指定副本集的名称。
Shard1-节点2:新建或修改配置文件:
vim /home/qiusj/.local/mongodb/sharded_cluster/myshardrs01_27118/mongod.conf
myshardrs_27118:
systemLog:
   # MongoDB发送所有日志输出的目标指定为文件
   destination: file
   path: "/home/qiusj/.local/mongodb/sharded_cluster/myshardrs01_27118/log/mongod.log"
   logAppend: true
storage:
   #mongod实例存储其数据目录,storage.dbPath设置仅适用于mongod
   dbPath: "/home/qiusj/.local/mongodb/sharded_cluster/myshardrs01_27118/data/db"
   journal:
      #启用或禁用持久性日志以确保数据文件保持有效和可恢复
      enabled: true
net:
   # 服务实例绑定所有IP,有副作用,副本集初始化的时候,节点名字会自动设置为本地域名而不是ip
   # bindIpAll: true
   #添加本机在局域网内的ip,如果是云服务器,也是云服务器所在的局域网ip,不是公网ip
   bindIp: 127.0.0.1,192.168.0.152
   port: 27118
setParameter:
   enableLocalhostAuthBypass: false
processManagement:
   #启动在后台运行mongos或mongod进程的守护进程模式
   fork: true
   #指定用于保存mongos或mongod进程的进程ID的文件位置,其中mongos或mongod将写入其PID
   pidFilePath: "/home/qiusj/.local/mongodb/sharded_cluster/myshardrs01_27118/log/mongod.pid"
replication:
   #副本集名称
   replSetName: myshardrs01
sharding:
   #分片角色
   clusterRole: shardsvr
Shard1-节点3:新建或修改配置文件
vim /home/qiusj/.local/mongodb/sharded_cluster/myshardrs01_27218/mongod.conf
myshardrs_27218:
systemLog:
   # MongoDB发送所有日志输出的目标指定为文件
   destination: file
   path: "/home/qiusj/.local/mongodb/sharded_cluster/myshardrs01_27218/log/mongod.log"
   logAppend: true
storage:
   #mongod实例存储其数据目录,storage.dbPath设置仅适用于mongod
   dbPath: "/home/qiusj/.local/mongodb/sharded_cluster/myshardrs01_27218/data/db"
   journal:
      #启用或禁用持久性日志以确保数据文件保持有效和可恢复
      enabled: true
net:
   # 服务实例绑定所有IP,有副作用,副本集初始化的时候,节点名字会自动设置为本地域名而不是ip
   # bindIpAll: true
   #添加本机在局域网内的ip,如果是云服务器,也是云服务器所在的局域网ip,不是公网ip
   bindIp: 127.0.0.1,192.168.0.152
   port: 27218
setParameter:
   enableLocalhostAuthBypass: false
processManagement:
   #启动在后台运行mongos或mongod进程的守护进程模式
   fork: true
   #指定用于保存mongos或mongod进程的进程ID的文件位置,其中mongos或mongod将写入其PID
   pidFilePath: "/home/qiusj/.local/mongodb/sharded_cluster/myshardrs01_27218/log/mongod.pid"
replication:
   #副本集名称
   replSetName: myshardrs01
sharding:
   #分片角色
   clusterRole: shardsvr
第二个分片副本集Shard2
准备存放数据和日志的目录:
qiusj@u20:~$ mkdir -p /home/qiusj/.local/mongodb/sharded_cluster/myshardrs02_27318/log
qiusj@u20:~$ mkdir -p /home/qiusj/.local/mongodb/sharded_cluster/myshardrs02_27318/data/db
qiusj@u20:~$ mkdir -p /home/qiusj/.local/mongodb/sharded_cluster/myshardrs02_27418/log
qiusj@u20:~$ mkdir -p /home/qiusj/.local/mongodb/sharded_cluster/myshardrs02_27418/data/db
qiusj@u20:~$ mkdir -p /home/qiusj/.local/mongodb/sharded_cluster/myshardrs02_27518/log
qiusj@u20:~$ mkdir -p /home/qiusj/.local/mongodb/sharded_cluster/myshardrs02_27518/data/db
Shard2-节点1:新建或修改配置文件
vim /home/qiusj/.local/mongodb/sharded_cluster/myshardrs02_27318/mongod.conf
myshardrs_27318:
systemLog:
   # MongoDB发送所有日志输出的目标指定为文件
   destination: file
   path: "/home/qiusj/.local/mongodb/sharded_cluster/myshardrs02_27318/log/mongod.log"
   logAppend: true
storage:
   #mongod实例存储其数据目录,storage.dbPath设置仅适用于mongod
   dbPath: "/home/qiusj/.local/mongodb/sharded_cluster/myshardrs02_27318/data/db"
   journal:
      #启用或禁用持久性日志以确保数据文件保持有效和可恢复
      enabled: true
net:
   # 服务实例绑定所有IP,有副作用,副本集初始化的时候,节点名字会自动设置为本地域名而不是ip
   # bindIpAll: true
   #添加本机在局域网内的ip,如果是云服务器,也是云服务器所在的局域网ip,不是公网ip
   bindIp: 127.0.0.1,192.168.0.152
   port: 27318
setParameter:
   enableLocalhostAuthBypass: false
processManagement:
   #启动在后台运行mongos或mongod进程的守护进程模式
   fork: true
   #指定用于保存mongos或mongod进程的进程ID的文件位置,其中mongos或mongod将写入其PID
   pidFilePath: "/home/qiusj/.local/mongodb/sharded_cluster/myshardrs02_27318/log/mongod.pid"
replication:
   #副本集名称
   replSetName: myshardrs02
sharding:
   #分片角色
   clusterRole: shardsvr
Shard2-节点2:新建或修改配置文件
vim /home/qiusj/.local/mongodb/sharded_cluster/myshardrs02_27418/mongod.conf
myshardrs_27418:
systemLog:
   # MongoDB发送所有日志输出的目标指定为文件
   destination: file
   path: "/home/qiusj/.local/mongodb/sharded_cluster/myshardrs02_27418/log/mongod.log"
   logAppend: true
storage:
   #mongod实例存储其数据目录,storage.dbPath设置仅适用于mongod
   dbPath: "/home/qiusj/.local/mongodb/sharded_cluster/myshardrs02_27418/data/db"
   journal:
      #启用或禁用持久性日志以确保数据文件保持有效和可恢复
      enabled: true
net:
   # 服务实例绑定所有IP,有副作用,副本集初始化的时候,节点名字会自动设置为本地域名而不是ip
   # bindIpAll: true
   #添加本机在局域网内的ip,如果是云服务器,也是云服务器所在的局域网ip,不是公网ip
   bindIp: 127.0.0.1,192.168.0.152
   port: 27418
setParameter:
   enableLocalhostAuthBypass: false
processManagement:
   #启动在后台运行mongos或mongod进程的守护进程模式
   fork: true
   #指定用于保存mongos或mongod进程的进程ID的文件位置,其中mongos或mongod将写入其PID
   pidFilePath: "/home/qiusj/.local/mongodb/sharded_cluster/myshardrs02_27418/log/mongod.pid"
replication:
   #副本集名称
   replSetName: myshardrs02
sharding:
   #分片角色
   clusterRole: shardsvr
Shard2-节点3:新建或修改配置文件
vim /home/qiusj/.local/mongodb/sharded_cluster/myshardrs02_27518/mongod.conf
myshardrs_27518:
systemLog:
   # MongoDB发送所有日志输出的目标指定为文件
   destination: file
   path: "/home/qiusj/.local/mongodb/sharded_cluster/myshardrs02_27518/log/mongod.log"
   logAppend: true
storage:
   #mongod实例存储其数据目录,storage.dbPath设置仅适用于mongod
   dbPath: "/home/qiusj/.local/mongodb/sharded_cluster/myshardrs02_27518/data/db"
   journal:
      #启用或禁用持久性日志以确保数据文件保持有效和可恢复
      enabled: true
net:
   # 服务实例绑定所有IP,有副作用,副本集初始化的时候,节点名字会自动设置为本地域名而不是ip
   # bindIpAll: true
   #添加本机在局域网内的ip,如果是云服务器,也是云服务器所在的局域网ip,不是公网ip
   bindIp: 127.0.0.1,192.168.0.152
   port: 27518
setParameter:
   enableLocalhostAuthBypass: false
processManagement:
   #启动在后台运行mongos或mongod进程的守护进程模式
   fork: true
   #指定用于保存mongos或mongod进程的进程ID的文件位置,其中mongos或mongod将写入其PID
   pidFilePath: "/home/qiusj/.local/mongodb/sharded_cluster/myshardrs02_27518/log/mongod.pid"
replication:
   #副本集名称
   replSetName: myshardrs02
sharding:
   #分片角色
   clusterRole: shardsvr
Config配置节点的搭建
准备存放数据和日志的目录:
qiusj@u20:~$ mkdir -p /home/qiusj/.local/mongodb/sharded_cluster/myconfigrs_27019/log
qiusj@u20:~$ mkdir -p /home/qiusj/.local/mongodb/sharded_cluster/myconfigrs_27019/data/db
qiusj@u20:~$ mkdir -p /home/qiusj/.local/mongodb/sharded_cluster/myconfigrs_27119/log
qiusj@u20:~$ mkdir -p /home/qiusj/.local/mongodb/sharded_cluster/myconfigrs_27119/data/db
qiusj@u20:~$ mkdir -p /home/qiusj/.local/mongodb/sharded_cluster/myconfigrs_27219/log
qiusj@u20:~$ mkdir -p /home/qiusj/.local/mongodb/sharded_cluster/myconfigrs_27219/data/db
Config Server-节点1,新建或修改配置文件:
vim /home/qiusj/.local/mongodb/sharded_cluster/myconfigrs_27019/mongod.conf
myconfigrs_27019:
systemLog:
   # MongoDB发送所有日志输出的目标指定为文件
   destination: file
   path: "/home/qiusj/.local/mongodb/sharded_cluster/myconfigrs_27019/log/mongod.log"
   logAppend: true
storage:
   #mongod实例存储其数据目录,storage.dbPath设置仅适用于mongod
   dbPath: "/home/qiusj/.local/mongodb/sharded_cluster/myconfigrs_27019/data/db"
   journal:
      #启用或禁用持久性日志以确保数据文件保持有效和可恢复
      enabled: true
net:
   # 服务实例绑定所有IP,有副作用,副本集初始化的时候,节点名字会自动设置为本地域名而不是ip
   # bindIpAll: true
   #添加本机在局域网内的ip,如果是云服务器,也是云服务器所在的局域网ip,不是公网ip
   bindIp: 127.0.0.1,192.168.0.152
   port: 27019
setParameter:
   enableLocalhostAuthBypass: false
processManagement:
   #启动在后台运行mongos或mongod进程的守护进程模式
   fork: true
   #指定用于保存mongos或mongod进程的进程ID的文件位置,其中mongos或mongod将写入其PID
   pidFilePath: "/home/qiusj/.local/mongodb/sharded_cluster/myconfigrs_27019/log/mongod.pid"
replication:
   #副本集名称
   replSetName: myconfigrs
sharding:
   #分片角色
   clusterRole: configsvr
Config Server-节点2,新建或修改配置文件:
vim /home/qiusj/.local/mongodb/sharded_cluster/myconfigrs_27119/mongod.conf
myconfigrs_27019:
systemLog:
   # MongoDB发送所有日志输出的目标指定为文件
   destination: file
   path: "/home/qiusj/.local/mongodb/sharded_cluster/myconfigrs_27119/log/mongod.log"
   logAppend: true
storage:
   #mongod实例存储其数据目录,storage.dbPath设置仅适用于mongod
   dbPath: "/home/qiusj/.local/mongodb/sharded_cluster/myconfigrs_27119/data/db"
   journal:
      #启用或禁用持久性日志以确保数据文件保持有效和可恢复
      enabled: true
net:
   # 服务实例绑定所有IP,有副作用,副本集初始化的时候,节点名字会自动设置为本地域名而不是ip
   # bindIpAll: true
   #添加本机在局域网内的ip,如果是云服务器,也是云服务器所在的局域网ip,不是公网ip
   bindIp: 127.0.0.1,192.168.0.152
   port: 27119
setParameter:
   enableLocalhostAuthBypass: false
processManagement:
   #启动在后台运行mongos或mongod进程的守护进程模式
   fork: true
   #指定用于保存mongos或mongod进程的进程ID的文件位置,其中mongos或mongod将写入其PID
   pidFilePath: "/home/qiusj/.local/mongodb/sharded_cluster/myconfigrs_27119/log/mongod.pid"
replication:
   #副本集名称
   replSetName: myconfigrs
sharding:
   #分片角色
   clusterRole: configsvr
Config Server-节点3,新建或修改配置文件:
vim /home/qiusj/.local/mongodb/sharded_cluster/myconfigrs_27219/mongod.conf
myconfigrs_27019:
systemLog:
   # MongoDB发送所有日志输出的目标指定为文件
   destination: file
   path: "/home/qiusj/.local/mongodb/sharded_cluster/myconfigrs_27219/log/mongod.log"
   logAppend: true
storage:
   #mongod实例存储其数据目录,storage.dbPath设置仅适用于mongod
   dbPath: "/home/qiusj/.local/mongodb/sharded_cluster/myconfigrs_27219/data/db"
   journal:
      #启用或禁用持久性日志以确保数据文件保持有效和可恢复
      enabled: true
net:
   # 服务实例绑定所有IP,有副作用,副本集初始化的时候,节点名字会自动设置为本地域名而不是ip
   # bindIpAll: true
   #添加本机在局域网内的ip,如果是云服务器,也是云服务器所在的局域网ip,不是公网ip
   bindIp: 127.0.0.1,192.168.0.152
   port: 27219
setParameter:
   enableLocalhostAuthBypass: false
processManagement:
   #启动在后台运行mongos或mongod进程的守护进程模式
   fork: true
   #指定用于保存mongos或mongod进程的进程ID的文件位置,其中mongos或mongod将写入其PID
   pidFilePath: "/home/qiusj/.local/mongodb/sharded_cluster/myconfigrs_27219/log/mongod.pid"
replication:
   #副本集名称
   replSetName: myconfigrs
sharding:
   #分片角色
   clusterRole: configsvr
初始化副本集Shard1
第一步:使用客户端命令连接任意一个节点,但这里尽量连接主节点:
/usr/local/mongodb/bin/mongo --host localhost --port 27018
第二步:执行初始化副本集命令:
> rs.initiate()
{
        "info2" : "no configuration specified. Using a default configuration for the set",
        "me" : "192.168.0.152:27018",
        "ok" : 1,
        "$clusterTime" : {
                "clusterTime" : Timestamp(1611023837, 1),
                "signature" : {
                        "hash" : BinData(0,"AAAAAAAAAAAAAAAAAAAAAAAAAAA="),
                        "keyId" : NumberLong(0)
                }
        },
        "operationTime" : Timestamp(1611023837, 1)
}
myshardrs01:SECONDARY>
myshardrs01:PRIMARY>
第三步:添加副本节点rs.add(host,arbiterOnly)
myshardrs01:PRIMARY> rs.add("192.168.0.152:27118")
{
        "ok" : 1,
        "$clusterTime" : {
                "clusterTime" : Timestamp(1611024066, 1),
                "signature" : {
                        "hash" : BinData(0,"AAAAAAAAAAAAAAAAAAAAAAAAAAA="),
                        "keyId" : NumberLong(0)
                }
        },
        "operationTime" : Timestamp(1611024066, 1)
}
第四步:添加仲裁节点rs.addArb(host)
myshardrs01:PRIMARY> rs.addArb("192.168.0.152:27218")
{
        "ok" : 1,
        "$clusterTime" : {
                "clusterTime" : Timestamp(1611024197, 1),
                "signature" : {
                        "hash" : BinData(0,"AAAAAAAAAAAAAAAAAAAAAAAAAAA="),
                        "keyId" : NumberLong(0)
                }
        },
        "operationTime" : Timestamp(1611024197, 1)
}
可以通过rs.conf()命令查看当前副本集配置:
myshardrs01:PRIMARY> rs.conf()
{
        "_id" : "myshardrs01",
        "version" : 3,
        "protocolVersion" : NumberLong(1),
        "writeConcernMajorityJournalDefault" : true,
        "members" : [
                {
                        "_id" : 0,
                        "host" : "192.168.0.152:27018",
                        "arbiterOnly" : false,
                        "buildIndexes" : true,
                        "hidden" : false,
                        "priority" : 1,
                        "tags" : {

                        },
                        "slaveDelay" : NumberLong(0),
                        "votes" : 1
                },
                {
                        "_id" : 1,
                        "host" : "192.168.0.152:27118",
                        "arbiterOnly" : false,
                        "buildIndexes" : true,
                        "hidden" : false,
                        "priority" : 1,
                        "tags" : {

                        },
                        "slaveDelay" : NumberLong(0),
                        "votes" : 1
                },
                {
                        "_id" : 2,
                        "host" : "192.168.0.152:27218",
                        "arbiterOnly" : true,
                        "buildIndexes" : true,
                        "hidden" : false,
                        "priority" : 0,
                        "tags" : {

                        },
                        "slaveDelay" : NumberLong(0),
                        "votes" : 1
                }
        ],
        "settings" : {
                "chainingAllowed" : true,
                "heartbeatIntervalMillis" : 2000,
                "heartbeatTimeoutSecs" : 10,
                "electionTimeoutMillis" : 10000,
                "catchUpTimeoutMillis" : -1,
                "catchUpTakeoverDelayMillis" : 30000,
                "getLastErrorModes" : {

                },
                "getLastErrorDefaults" : {
                        "w" : 1,
                        "wtimeout" : 0
                },
                "replicaSetId" : ObjectId("600645dd88da2128c259af5a")
        }
}
myshardrs01:PRIMARY> exit
bye
初始化副本集Shard2
/usr/local/mongodb/bin/mongo --host=localhost --port=27318

>rs.initiate()

myshardrs02:PRIMARY> rs.add("192.168.0.152:27418")
myshardrs02:PRIMARY> rs.addArb("192.168.0.152:27518")
myshardrs02:PRIMARY> rs.conf()
初始化副本集Config Server
/usr/local/mongodb/bin/mongo --host=localhost --port=27019

> rs.initiate()

myconfigrs:PRIMARY> rs.add("192.168.0.152:27119")
myconfigrs:PRIMARY> rs.add("192.168.0.152:27219")
myconfigrs:PRIMARY> rs.conf()
路由节点的创建
准备存放数据和日志的目录
mkdir -p /home/qiusj/.local/mongodb/sharded_cluster/mymongos_27017/log
mongos的主要作用是节点的分发,不存储具体的业务数据,所以不需要data目录
mymongos_27017节点:
新建或修改配置文件
vim /home/qiusj/.local/mongodb/sharded_cluster/mymongos_27017/mongos.conf
mongos.conf
systemLog:
   # MongoDB发送所有日志输出的目标指定为文件
   destination: file
   path: "/home/qiusj/.local/mongodb/sharded_cluster/mymongos_27017/log/mongod.log"
   logAppend: true
net:
   # 服务实例绑定所有IP,有副作用,副本集初始化的时候,节点名字会自动设置为本地域名而不是ip
   # bindIpAll: true
   #添加本机在局域网内的ip,如果是云服务器,也是云服务器所在的局域网ip,不是公网ip
   bindIp: 127.0.0.1,192.168.0.152
   port: 27017
setParameter:
   enableLocalhostAuthBypass: false
processManagement:
   #启动在后台运行mongos或mongod进程的守护进程模式
   fork: true
   #指定用于保存mongos或mongod进程的进程ID的文件位置,其中mongos或mongod将写入其PID
   pidFilePath: "/home/qiusj/.local/mongodb/sharded_cluster/mymongos_27017/log/mongod.pid"
sharding:
   #指定配置节点副本集,副本集名称/ip1:port1,ip2:port2,...
   configDB: myconfigrs/192.168.0.152:27019,192.168.0.152:27119,192.168.0.152:27219
启动mongos:
qiusj@u20:~$ /usr/local/mongodb/bin/mongos -f /home/qiusj/.local/mongodb/sharded_cluster/mymongos_27017/mongos.conf
about to fork child process, waiting until server is ready for connections.
forked process: 3116889
child process started successfully, parent exiting
如果启动失败可以查看log目录下的日志,查看失败原因。
客户端连接路由,登陆mongos:
/usr/local/mongodb/bin/mongo --host 192.168.0.152 --port 27017
此时,写不进去数据,如果写数据会报错:
mongos> db.article.insert({"name":"jack"})
WriteCommandError({
        "ok" : 0,
        "errmsg" : "unable to initialize targeter for write op for collection meface.article :: caused by :: Database meface could not be created :: caused by :: No shards found",
        "code" : 70,
        "codeName" : "ShardNotFound",
        "operationTime" : Timestamp(1611037501, 3),
        "$clusterTime" : {
                "clusterTime" : Timestamp(1611037501, 3),
                "signature" : {
                        "hash" : BinData(0,"AAAAAAAAAAAAAAAAAAAAAAAAAAA="),
                        "keyId" : NumberLong(0)
                }
        }
})
没有找到分片(No shards found),所以需要添加分片:
单机:sh.addShard("IP:Port")
副本集: sh.addShard("分片副本集名称/IP1:Port1,IP2:Port2,...")
#添加第一个分片副本集Shard1
mongos> sh.addShard("myshardrs01/192.168.0.152:27018,192.168.0.152:27118,192.168.0.152:27218")
{
        "shardAdded" : "myshardrs01",
        "ok" : 1,
        "operationTime" : Timestamp(1611038207, 5),
        "$clusterTime" : {
                "clusterTime" : Timestamp(1611038207, 5),
                "signature" : {
                        "hash" : BinData(0,"AAAAAAAAAAAAAAAAAAAAAAAAAAA="),
                        "keyId" : NumberLong(0)
                }
        }
}

#添加第二个分片副本集Shard2
mongos> sh.addShard("myshardrs02/192.168.0.152:27318,192.168.0.152:27418,192.168.0.152:27518")
如果分片副本集名称重复,不会覆盖前面添加的,会无效。
通过sh.status()查看所添加的分片信息:
mongos> sh.status()
--- Sharding Status ---
  sharding version: {
        "_id" : 1,
        "minCompatibleVersion" : 5,
        "currentVersion" : 6,
        "clusterId" : ObjectId("60064b07f7f895e2e526d8f6")
  }
  shards:
        {  "_id" : "myshardrs01",  "host" : "myshardrs01/192.168.0.152:27018,192.168.0.152:27118",  "state" : 1 }
        {  "_id" : "myshardrs02",  "host" : "myshardrs02/192.168.0.152:27318,192.168.0.152:27418",  "state" : 1 }
  active mongoses:
        "4.4.2" : 1
  autosplit:
        Currently enabled: yes
  balancer:
        Currently enabled:  yes
        Currently running:  no
        Failed balancer rounds in last 5 attempts:  0
        Migration Results for the last 24 hours:
                5 : Success
  databases:
        {  "_id" : "config",  "primary" : "config",  "partitioned" : true }
                config.system.sessions
                        shard key: { "_id" : 1 }
                        unique: false
                        balancing: true
                        chunks:
                                myshardrs01     1019
                                myshardrs02     5
                        too many chunks to print, use verbose if you want to force print
mongos>
在shards中可以看到已经添加的分片,但其中分片的副本集中没有包含仲裁者。
如果添加分片失败,需要先手动移除分片,检查添加分片信息的正确性后,再次添加分片。
移除分片命令:
use admin
db.runCommand({removeShard:"myshardrs02"})
如果只剩下最后一个shard,是无法删除的。移除时会自动转移分片数据,需要一个时间过程,完成后再次执行删除分片命令才能真正的删除。
开启分片功能
语法:sh.enableSharding("库名")、sh.shardCollection("库名.集合名",{"key":1})
先是使database库能分片,再指定库中需要分片的集合及分片使用的
片键,最终是对集合开启分片。
示例:在mongos上的meface数据库配置sharding:
mongos> sh.enableSharding("meface")
{
        "ok" : 1,
        "operationTime" : Timestamp(1611040720, 6),
        "$clusterTime" : {
                "clusterTime" : Timestamp(1611040720, 6),
                "signature" : {
                        "hash" : BinData(0,"AAAAAAAAAAAAAAAAAAAAAAAAAAA="),
                        "keyId" : NumberLong(0)
                }
        }
}
集合分片
对集合分片,必须使用sh.shardCollection()方法指定集合和分片键。语法:
sh.shardCollection(namespace,key,unique)
shardCollection命令必须在admin数据库上运行。使用该命令前必须先对集合所在的数据库开启分片功能。
| param | Type | Dedcription |
|---|---|---|
| namespace | string | 要(分片)共享的目标集合的命名空间,格式:<database>.<collection> |
| key | document | 用作分片键的索引规范文档。shard键决定MongoDB如何在shard之间分发文档。除非集合为空,否则索引必须在shard collection命令之前存在。如果集合为空,则MongoDB在对集合进行分片之前创建索引,前提是支持分片键的索引不存在。简单的说:由包含字段和该字段的索引遍历方向的文档组成。 |
| unique | boolean | 当值为true时,片键字段上会限制为确保是唯一索引。哈希策略片键不支持唯一索引。默认为false。 |
对集合进行分片时,需要选择一个片键(Shard Key),shard key是每条记录都必须包含的,且建立了索引的单个字段或复合字段,MongoDB根据片键将数据划分到不同 数据块 中,并将 数据块 均衡地分布到所有分片中。为了按照片键划分数据块,MongoDB使用基于哈希的分片方式(随机平均分配)或者基于范围的分片方式(数值大小分配)
用于作为片键的字段必须为必填字段。
分片策略
策略一:哈希策略
对于基于哈希的分片,MongoDB计算一个字段的哈希值,并用这个哈希值来创建数据块。
在使用基于哈希分片的系统中,拥有“相近”片键的文档分可能不会存储在同一个数据块中,因此数据的分理性更好一些:
使用nickname作为片键,根据其值的哈希值进行数据分片
mongos> sh.shardCollection("meface.article",{"nickname":"hashed"})
{
        "collectionsharded" : "meface.article",
        "collectionUUID" : UUID("4fe4845e-1b85-4585-a8d1-0c71bc43529e"),
        "ok" : 1,
        "operationTime" : Timestamp(1611048721, 25),
        "$clusterTime" : {
                "clusterTime" : Timestamp(1611048721, 25),
                "signature" : {
                        "hash" : BinData(0,"AAAAAAAAAAAAAAAAAAAAAAAAAAA="),
                        "keyId" : NumberLong(0)
                }
        }
}
查看分片状态:sh.status()
mongos> sh.status()
--- Sharding Status ---
  sharding version: {
        "_id" : 1,
        "minCompatibleVersion" : 5,
        "currentVersion" : 6,
        "clusterId" : ObjectId("60064b07f7f895e2e526d8f6")
  }
  shards:
        {  "_id" : "myshardrs01",  "host" : "myshardrs01/192.168.0.152:27018,192.168.0.152:27118",  "state" : 1 }
        {  "_id" : "myshardrs02",  "host" : "myshardrs02/192.168.0.152:27318,192.168.0.152:27418",  "state" : 1 }
  active mongoses:
        "4.4.2" : 1
  autosplit:
        Currently enabled: yes
  balancer:
        Currently enabled:  yes
        Currently running:  no
        Failed balancer rounds in last 5 attempts:  0
        Migration Results for the last 24 hours:
                512 : Success
  databases:
        {  "_id" : "config",  "primary" : "config",  "partitioned" : true }
                config.system.sessions
                        shard key: { "_id" : 1 }
                        unique: false
                        balancing: true
                        chunks:
                                myshardrs01     512
                                myshardrs02     512
                        too many chunks to print, use verbose if you want to force print
        {  "_id" : "meface",  "primary" : "myshardrs02",  "partitioned" : true,  "version" : {  "uuid" : UUID("dbfea2d2-b4cc-467f-8bba-85b540ff848a"),  "lastMod" : 1 } }
                meface.article
                        shard key: { "nickname" : "hashed" }
                        unique: false
                        balancing: true
                        chunks:
                                myshardrs01     2
                                myshardrs02     2
                        { "nickname" : { "$minKey" : 1 } } -->> { "nickname" : NumberLong("-4611686018427387902") } on : myshardrs01 Timestamp(1, 0)
                        { "nickname" : NumberLong("-4611686018427387902") } -->> { "nickname" : NumberLong(0) } on : myshardrs01 Timestamp(1, 1)
                        { "nickname" : NumberLong(0) } -->> { "nickname" : NumberLong("4611686018427387902") } on : myshardrs02 Timestamp(1, 2)
                        { "nickname" : NumberLong("4611686018427387902") } -->> { "nickname" : { "$maxKey" : 1 } } on : myshardrs02 Timestamp(1, 3)
策略二:范围策略
对于基于范围策略的分片,MongoDB按照片键的范围把数据分成不同部分,假设有一个数字的片键:想像一个从负无穷到正无穷的直线,每一个片键的值都是直线上画了一个点,MongoDB把这条直线划分为更短的不重叠点片段,并称之为数据块,每个数据块包含了片键在一定范围内的数据。
在使用片键做范围划分的系统中,拥有“相近”片键的文档很可能存储在同一个数据块中,因此也会存储在同一个分片中。
如果用作者年龄字段作为片键,按照点赞数的值进行分片:
mongos> sh.shardCollection("meface.author",{"age":1})
{
        "collectionsharded" : "meface.author",
        "collectionUUID" : UUID("3958a862-b1fb-46c8-a8dc-5f9db363c642"),
        "ok" : 1,
        "operationTime" : Timestamp(1611050371, 8),
        "$clusterTime" : {
                "clusterTime" : Timestamp(1611050371, 8),
                "signature" : {
                        "hash" : BinData(0,"AAAAAAAAAAAAAAAAAAAAAAAAAAA="),
                        "keyId" : NumberLong(0)
                }
        }
}
分片插入测试
测试一(哈希策略):登陆mongos后,向article循环插入1000条测试数据:
switched to db meface
mongos> db.article.find()
mongos> for(var i=1;i<=1000;i++){db.article.insert({_id:i+"",nickname:"小明"+i})}
WriteResult({ "nInserted" : 1 })
mongos> db.article.count()
1000
mongo的shell是一个JavaScript的shell。
从路由上插入数据,必须包含片键,否则无法插入。
分别登陆两个分片副本集的主节点,查看文档数量:
第一个分片副本集:
qiusj@u20:~$ /usr/local/mongodb/bin/mongo --host localhost --port 27018

myshardrs01:PRIMARY> use meface
switched to db meface
myshardrs01:PRIMARY> db.article.count()
473
第二个分片副本集:
qiusj@u20:~$ /usr/local/mongodb/bin/mongo --host localhost --port 27318

myshardrs02:PRIMARY> use meface
switched to db meface
myshardrs02:PRIMARY> db.article.count()
527
可以看到1000条数据根据【片键】的哈希值近似均匀地分布在2个shard上。
这种分配方式非常易于水平扩展:一旦数据存储需要更大空间,可以直接在增加分片即可,同时提升性能。使用db.article.stats()可以查看单个集合的完整情况,mongos执行该命令可以查看该集合的数据分片情况。
sh.stats()查看本库内所有集合的分片信息。
测试二(范围策略):登陆mongos后,向author循环插入1000条测试数据:
mongos> for(var i=1;i<=1000;i++){db.author.insert({"name":"小红"+i,"age":NumberInt(i%120)})}
WriteResult({ "nInserted" : 1 })
mongos> db.author.count()
1000
插入成功后,仍然要分别查看两个分片副本集的数据情况。
分片效果:
myshardrs02:PRIMARY> show collections
article
author
myshardrs02:PRIMARY> db.author.count()
1000
可以看到全部数据都存储在第二个分片中。
造成没有分片的原因可能有:
-
系统繁忙,正在分片中
-
数据块(
chunk)没有填满,默认数据块尺寸(chunksize)是64M,填满后才会考虑向其他片的数据块填充数据,因此,为了测试,可以将其改小use config db.settings.save({_id:"chunksize",value:1})测试完改回来:
db.settings.save({_id:"chunksize",value:64})要先改小,再设置分片。为了测试先删除集合,重新建立集合的分片策略,再插入数据测试。
添加另一个路由节点
创建日志存放的目录:
#--------mongos02
mkdir -p /home/qiusj/.local/mongodb/sharded_cluster/mymongos_27117/log
新建或修改配置文件:
vi /home/qiusj/.local/mongodb/sharded_cluster/mymongos_27117/mongos.conf
mongos.conf
systemLog:
   # MongoDB发送所有日志输出的目标指定为文件
   destination: file
   path: "/home/qiusj/.local/mongodb/sharded_cluster/mymongos_27117/log/mongod.log"
   logAppend: true
net:
   # 服务实例绑定所有IP,有副作用,副本集初始化的时候,节点名字会自动设置为本地域名而不是ip
   # bindIpAll: true
   #添加本机在局域网内的ip,如果是云服务器,也是云服务器所在的局域网ip,不是公网ip
   bindIp: 127.0.0.1,192.168.0.152
   port: 27117
setParameter:
   enableLocalhostAuthBypass: false
processManagement:
   #启动在后台运行mongos或mongod进程的守护进程模式
   fork: true
   #指定用于保存mongos或mongod进程的进程ID的文件位置,其中mongos或mongod将写入其PID
   pidFilePath: "/home/qiusj/.local/mongodb/sharded_cluster/mymongos_27117/log/mongod.pid"
sharding:
   #指定配置节点副本集,副本集名称/ip1:port1,ip2:port2,...
   configDB: myconfigrs/192.168.0.152:27019,192.168.0.152:27119,192.168.0.152:27219
启动mongos02:
qiusj@u20:~$ /usr/local/mongodb/bin/mongos -f /home/qiusj/.local/mongodb/sharded_cluster/mymongos_27117/mongos.conf
about to fork child process, waiting until server is ready for connections.
forked process: 3372317
child process started successfully, parent exiting
启动之后就可以直接使用了,因为之前configDB里面的副本集已经完成分片了。
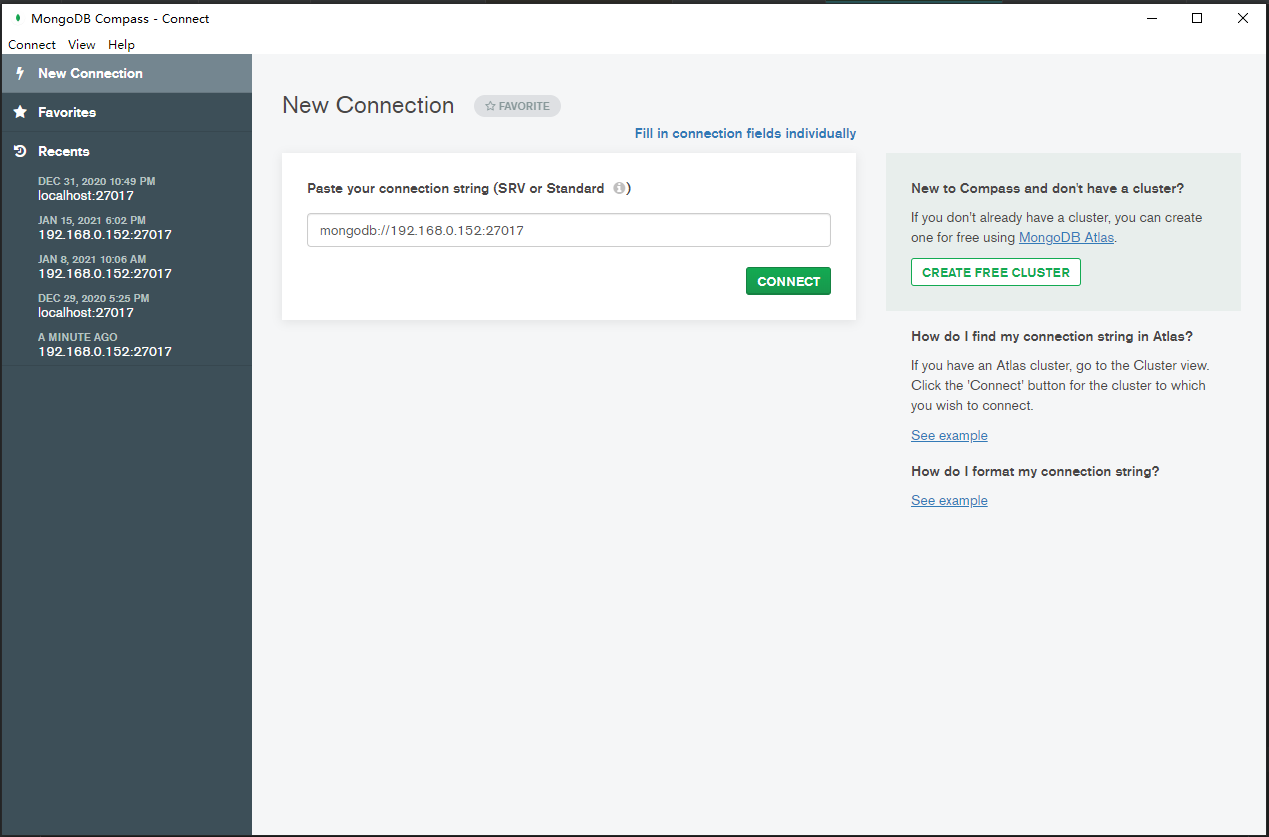
使用Compass连接分片集群
直接连接路由节点就可以了。
使用SpringData连接测试
application.yml
spring:
  #数据源配置
  data:
    mongodb:
      #连接分片集群的路由节点,多个路由用逗号分隔,mongodb会有其负载均衡的策略
      uri: mongodb://192.168.0.152:27017,192.168.0.152:27117/meface
#      host: 192.168.0.152
#      database: meface
#      port: 27017
#	   使用uri的方式
#      uri:mongodb://192.168.0.152:27017/meface
参考文章
[1] Replication https://docs.mongodb.com/manual/replication/
[2] Sharding https://docs.mongodb.com/manual/sharding/
[3] Sharding reference https://docs.mongodb.com/manual/reference/sharding/
[4] Security Reference https://docs.mongodb.com/manual/reference/security/