22 KiB
| title | date | author | tags | categories | ||
|---|---|---|---|---|---|---|
| 快速起步 | 2021-09-08 | ac |
|
|
1. hello ol
其实学习的最好方式应该是官方文档,但可能会受限于个人的知识储备问题,“吸收”到的知识也会有所差别。
<!doctype html>
<html lang="en">
  <head>
    <link rel="stylesheet" href="https://cdn.jsdelivr.net/gh/openlayers/openlayers.github.io@master/en/v6.4.3/css/ol.css" type="text/css">
    <style>
      .map {
        height: 400px;
        width: 100%;
      }
    </style>
    <script src="https://cdn.jsdelivr.net/gh/openlayers/openlayers.github.io@master/en/v6.4.3/build/ol.js"></script>
    <title>OpenLayers example</title>
  </head>
  <body>
    <h2>My Map</h2>
    <div id="map" class="map"></div>
    <script type="text/javascript">
     /*
      * 地图表现:必备三要素,
      * 	图层(Layer)
      * 	视图(View)
      * 	目标容器(target)
      *
      * 核心类:Map、Layer、Source、View
      * 渲染方式:ol3中有Canvas、WebGL、DOM
      *         ol5中删除了DOM渲染方式,Canvas(由ol.renderer.Map实现)、
      *								 WebGL(由ol.renderer.Layer实现)
      */
      var map = new ol.Map({
        target: 'map',
        layers: [
          new ol.layer.Tile({
            source: new ol.source.OSM()
          })
        ],
        view: new ol.View({
          center: ol.proj.fromLonLat([37.41, 8.82]),
          zoom: 4
        })
      });
    </script>
  </body>
</html>
这是官网上的quickstart的中代码:
- 采用传统的CDN的方式引入ol;
- 创建了一个id为map的div元素,作为地图的容器,并通过class指定元素大小;
- 再使用ol中Map类的构造器创建地图,配置参数中必须配置三个参数才能显示地图。其中
target指定页面中的容器标签;layers配置地图的图层;view可以指定地图的中心位置和地图的缩放级别,还可以配置地图的投影等。
ol中没有在view里面配置投影的,默认使用的是Web墨卡托投影(EPSG:3857),投影相关的方法在ol.proj的命名空间下。fromLonLat方法是将经纬度的地理坐标转换为投影坐标,默认的目标投影是EPSG:3857。
2. 开发方式
除了上述的传统的直接使用CND引入ol的开发方式外,目前在前端开发最常用的还是安装npm包的形式。
需要安装Nodejs环境
前端工程化解决方案有很多,像Webpack、Parcel等。ol官方的教程使用的是Parcel。
下面我们使用Parcel工具来手动配置一个工程化的示例:
-
安装
Parcel#npm npm install -g parcel-bundler #yarn yarn global add parcel-bundler -
创建项目目录,目录名称为
pracelolmkdir pracelol && cd pracelol -
初始化项目,生成包管理文件
package.json,安装olnpm init -y npm install ol -
创建
index.html文件和main.js文件:index.html<!DOCTYPE html> <html lang="en"> <head> <meta charset="UTF-8"> <meta http-equiv="X-UA-Compatible" content="IE=edge"> <meta name="viewport" content="width=device-width, initial-scale=1.0"> <title>Document</title> <script type="module" src="main.js"></script> </head> <body> <div id="map" style="width: 100%;height: 400px;"></div> </body> </html>script标签中添加type属性,值为module,Parcel会将该标签引用的JS文件转码为ES5。mian.jsimport 'ol/ol.css'; import Map from 'ol/Map'; import View from 'ol/View'; import OSM from 'ol/source/OSM'; import TileLayer from 'ol/layer/Tile'; var map = new Map({ layers: [ new TileLayer({source: new OSM()}) ], view: new View({ center: [0, 0], zoom: 4 }), target: 'map' }); -
在
package.json文件中配置脚本命令:{ "name": "pracelol", "version": "1.0.0", "description": "", "main": "index.js", "scripts": { "dev":"parcel index.html" }, "keywords": [], "author": "", "license": "ISC", "dependencies": { "ol": "^6.7.0" } } -
运行
npm run dev命令,会执行parcel index.html将index.html文件作为入口文件进行打包编译,会看到项目中做出了一个dist目录。并启动一个地址为http://localhost:1234的Web服务。 -
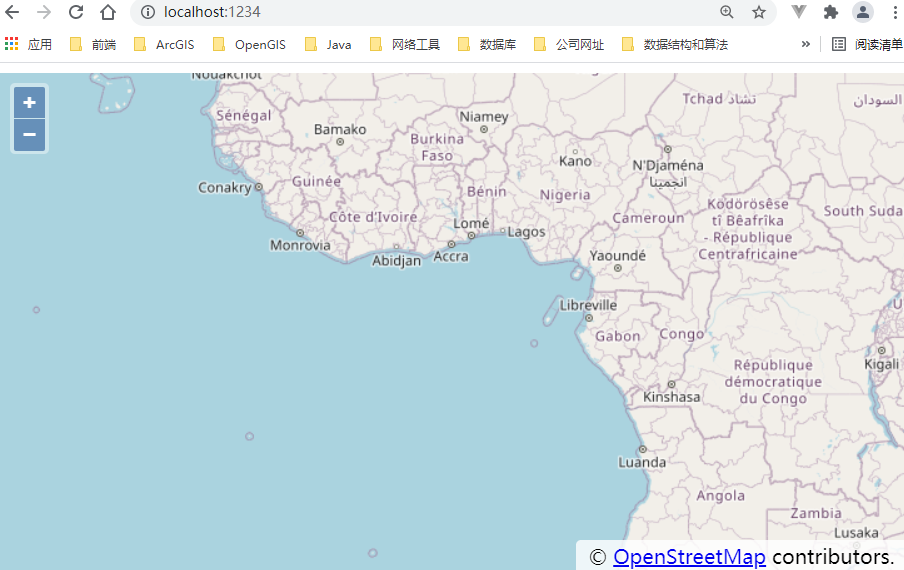
效果:
3. 源码解析
Map.js
/**
 * @module ol/Map
 */
import PluggableMap from './PluggableMap.js';
import {defaults as defaultControls} from './control.js';
import {defaults as defaultInteractions} from './interaction.js';
import {assign} from './obj.js';
import CompositeMapRenderer from './renderer/Composite.js';

/**
 * @classdesc
 * The map is the core component of OpenLayers. For a map to render, a view,
 * one or more layers, and a target container are needed:
 *
 *     import Map from 'ol/Map';
 *     import View from 'ol/View';
 *     import TileLayer from 'ol/layer/Tile';
 *     import OSM from 'ol/source/OSM';
 *
 *     var map = new Map({
 *       view: new View({
 *         center: [0, 0],
 *         zoom: 1
 *       }),
 *       layers: [
 *         new TileLayer({
 *           source: new OSM()
 *         })
 *       ],
 *       target: 'map'
 *     });
 *
 * The above snippet creates a map using a {@link module:ol/layer/Tile} to
 * display {@link module:ol/source/OSM~OSM} OSM data and render it to a DOM
 * element with the id `map`.
 *
 * The constructor places a viewport container (with CSS class name
 * `ol-viewport`) in the target element (see `getViewport()`), and then two
 * further elements within the viewport: one with CSS class name
 * `ol-overlaycontainer-stopevent` for controls and some overlays, and one with
 * CSS class name `ol-overlaycontainer` for other overlays (see the `stopEvent`
 * option of {@link module:ol/Overlay~Overlay} for the difference). The map
 * itself is placed in a further element within the viewport.
 *
 * Layers are stored as a {@link module:ol/Collection~Collection} in
 * layerGroups. A top-level group is provided by the library. This is what is
 * accessed by `getLayerGroup` and `setLayerGroup`. Layers entered in the
 * options are added to this group, and `addLayer` and `removeLayer` change the
 * layer collection in the group. `getLayers` is a convenience function for
 * `getLayerGroup().getLayers()`. Note that {@link module:ol/layer/Group~Group}
 * is a subclass of {@link module:ol/layer/Base}, so layers entered in the
 * options or added with `addLayer` can be groups, which can contain further
 * groups, and so on.
 *
 * @api
 */
class Map extends PluggableMap {
  /**
   * @param {import("./PluggableMap.js").MapOptions} options Map options.
   */
  constructor(options) {
    options = assign({}, options);
    if (!options.controls) {
      options.controls = defaultControls();
    }
    if (!options.interactions) {
      options.interactions = defaultInteractions();
    }

    super(options);
  }

  createRenderer() {
    return new CompositeMapRenderer(this);
  }
}

export default Map;
我们可以在ol.map源码的注释中知道map是Opnelayer中核心的组件,一个map必须要有一个View实例、一个或多个图层layers和一个用于确定页面渲染DOM节点的id的target,这是地图表现的必备三要素(view、layers、target)。
地图初始化后,在id为target属性指定的DOM节点为容器生成了一系列的地图表现相关的标签。
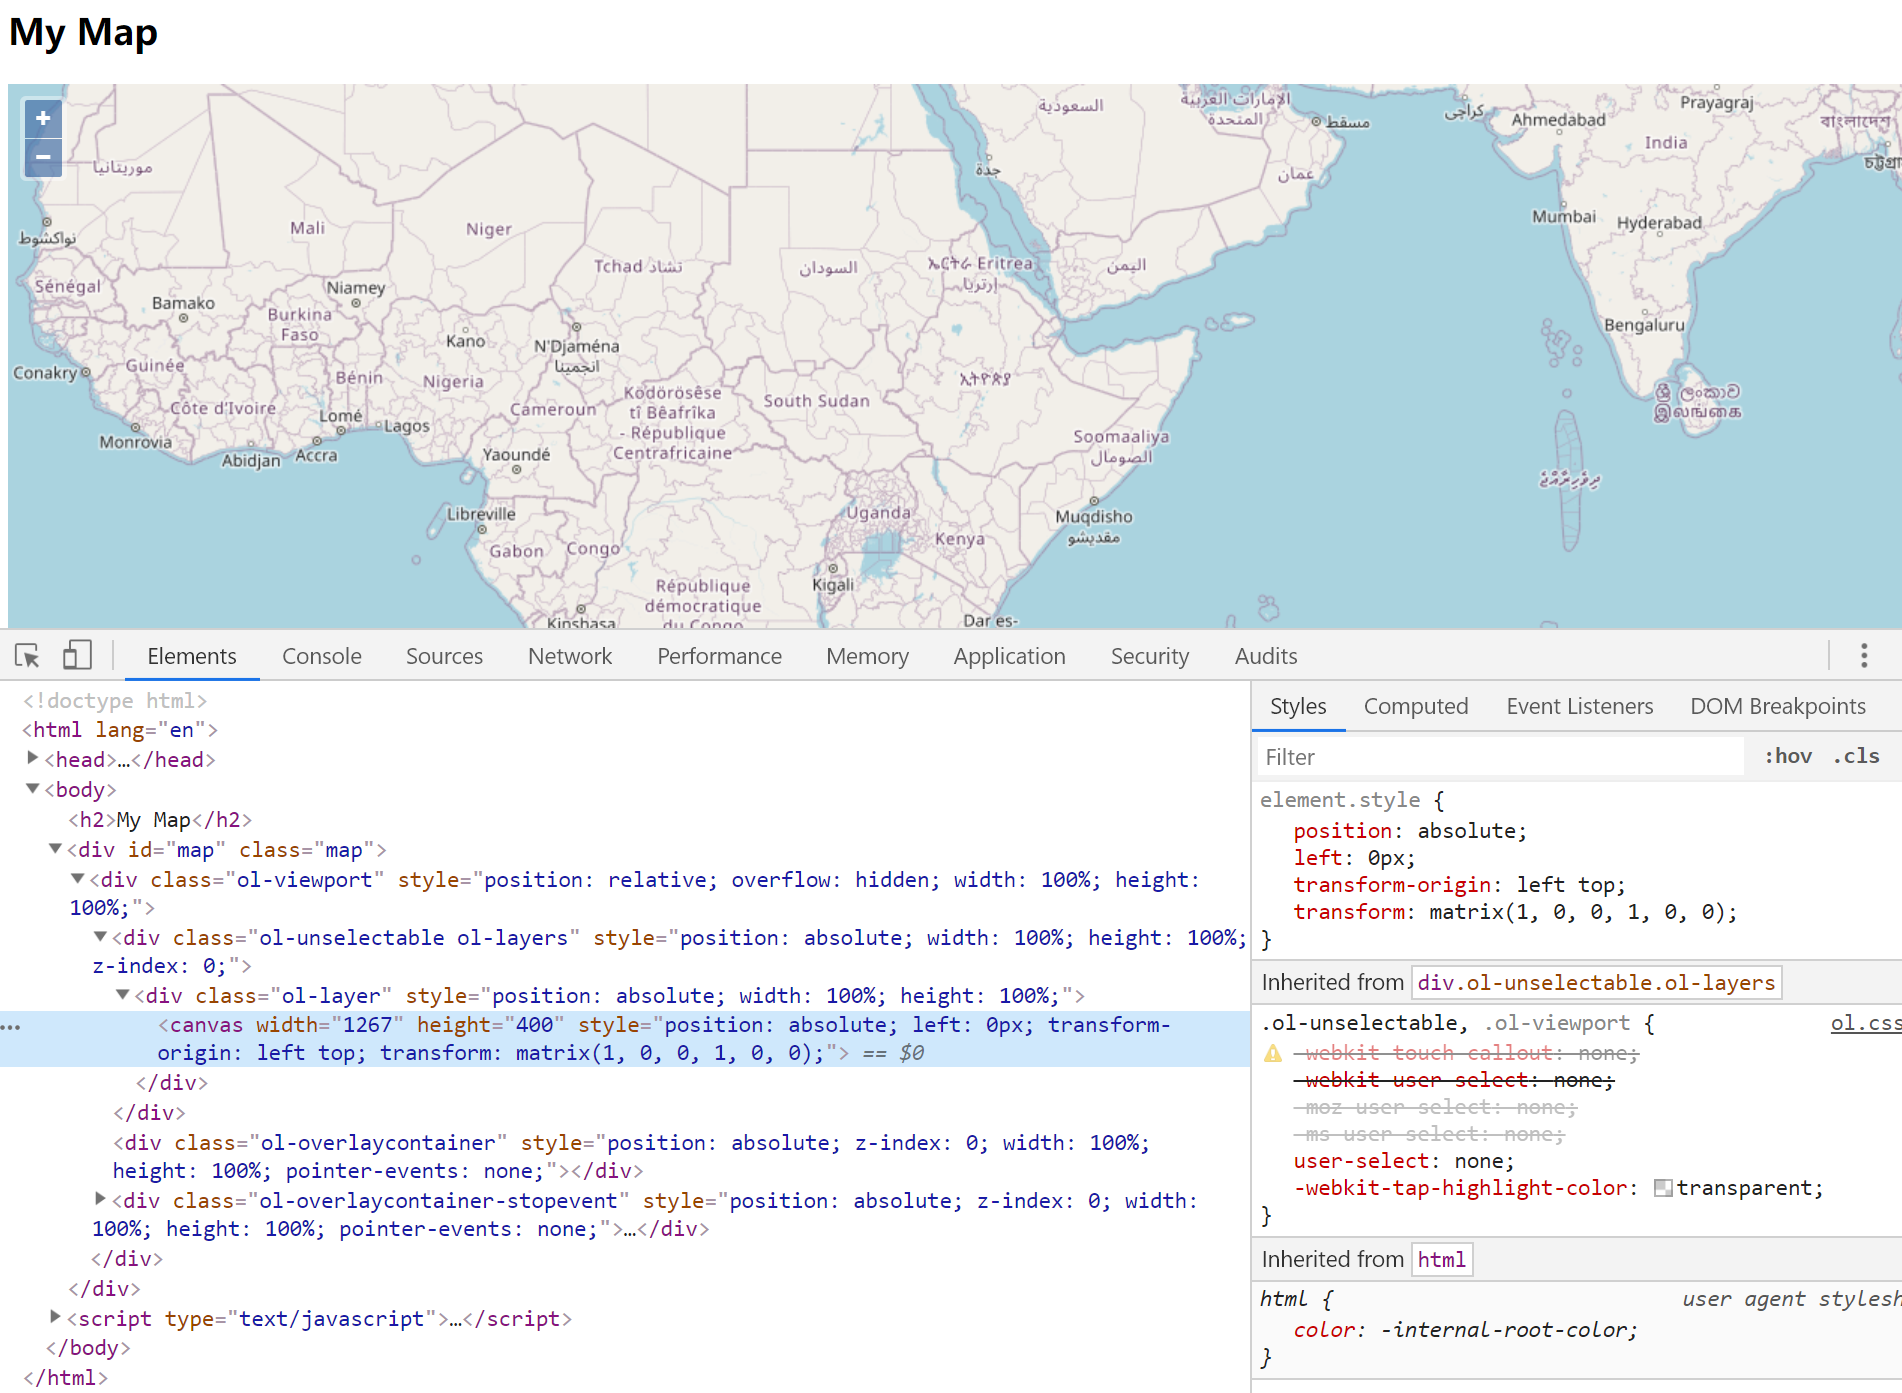
在target元素的位置内创建地图视口容器class属性为ol-viewport,可以通过getViewport()方法获取该节点。另外在ol-viewport里面创建用于图层渲染的ol-layer节点、用于在地图上添加注记图标的ol-overlaycontainer节点和用于展示地图控件的ol-overlaycontainer-stopevent节点。
map:Map.targetol.viewport:Map.view 视图ol-layers:Map.getLayers() 图层组(集合)ol-layer:图层,根据渲染方式创建Canvas元素- canvas :画布
ol-overlaycontainer:Map.getOverlays() 内容叠加层ol-overlaycontainer-stopevent:Map.getControls() 控件层
PC端页面视口的大小就是浏览器的大小,但这里
ol-viewport的宽高大小设置都为100%作为地图的视口,是最近的父辈元素的容器大小,即target属性指定的DOM元素的大小。
图层组Layers是以图层数组的形式存储,与其他地图API不同,ol中没有必须的底图basemap,所有的图层都按照加载的顺序叠加显示,先添加的在下面,从底向上排列。
在ol.Map源码中,Map构造器作为主入口,接受参数,判断是否使用默认的控件和交互控件,其余渲染流程都在父类PluggableMap中。主要渲染流程如下:
-
配置参数option,解析控件、交互组件、键盘事件DOM对象、叠加层和图层数组
const optionsInternal = createOptionsInternal(options); /** * @param {MapOptions} options Map options. * @return {MapOptionsInternal} Internal map options. */ function createOptionsInternal(options) { ... return { controls: controls, //控件 interactions: interactions, //交互组件 keyboardEventTarget: keyboardEventTarget, //键盘事件dom对象 overlays: overlays, //叠加层 values: values //图层数组 }; } -
构建页面DOM元素,
ol-viewport和子容器ol-overlaycontainer、ol-overlaycontainer-stopevent/** * @private * @type {!HTMLElement} */ this.viewport_ = document.createElement('div'); this.viewport_.className = 'ol-viewport' + ('ontouchstart' in window ? ' ol-touch' : ''); this.viewport_.style.position = 'relative'; this.viewport_.style.overflow = 'hidden'; this.viewport_.style.width = '100%'; this.viewport_.style.height = '100%'; /** * @private * @type {!HTMLElement} */ this.overlayContainer_ = document.createElement('div'); this.overlayContainer_.style.position = 'absolute'; this.overlayContainer_.style.zIndex = '0'; this.overlayContainer_.style.width = '100%'; this.overlayContainer_.style.height = '100%'; this.overlayContainer_.className = 'ol-overlaycontainer'; this.viewport_.appendChild(this.overlayContainer_); /** * @private * @type {!HTMLElement} */ this.overlayContainerStopEvent_ = document.createElement('div'); this.overlayContainerStopEvent_.style.position = 'absolute'; this.overlayContainerStopEvent_.style.zIndex = '0'; this.overlayContainerStopEvent_.style.width = '100%'; this.overlayContainerStopEvent_.style.height = '100%'; this.overlayContainerStopEvent_.className = 'ol-overlaycontainer-stopevent'; this.viewport_.appendChild(this.overlayContainerStopEvent_); /** * 绑定浏览器事件 */ this.mapBrowserEventHandler_ = new MapBrowserEventHandler(this, options.moveTolerance); const handleMapBrowserEvent = this.handleMapBrowserEvent.bind(this); for (const key in MapBrowserEventType) { this.mapBrowserEventHandler_.addEventListener(MapBrowserEventType[key], handleMapBrowserEvent); } /** * @private * @type {HTMLElement|Document} */ this.keyboardEventTarget_ = optionsInternal.keyboardEventTarget; /** * @private * @type {?Array<import("./events.js").EventsKey>} */ this.keyHandlerKeys_ = null; const handleBrowserEvent = this.handleBrowserEvent.bind(this); this.viewport_.addEventListener(EventType.CONTEXTMENU, handleBrowserEvent, false); this.viewport_.addEventListener(EventType.WHEEL, handleBrowserEvent, PASSIVE_EVENT_LISTENERS ? {passive: false} : false); -
创建瓦片队列,添加图层、视图、SIZE、TARGET变化的处理事件
/** * @private * @type {TileQueue} */ this.tileQueue_ = new TileQueue( this.getTilePriority.bind(this), this.handleTileChange_.bind(this)); this.addEventListener(getChangeEventType(MapProperty.LAYERGROUP), this.handleLayerGroupChanged_); this.addEventListener(getChangeEventType(MapProperty.VIEW), this.handleViewChanged_); this.addEventListener(getChangeEventType(MapProperty.SIZE), this.handleSizeChanged_); this.addEventListener(getChangeEventType(MapProperty.TARGET), this.handleTargetChanged_); -
解析控件参数,并绑定事件监听
this.controls.forEach( /** * @param {import("./control/Control.js").default} control Control. * @this {PluggableMap} */ function(control) { control.setMap(this); }.bind(this)); this.controls.addEventListener(CollectionEventType.ADD, /** * @param {import("./Collection.js").CollectionEvent} event CollectionEvent. */ function(event) { event.element.setMap(this); }.bind(this)); this.controls.addEventListener(CollectionEventType.REMOVE, /** * @param {import("./Collection.js").CollectionEvent} event CollectionEvent. */ function(event) { event.element.setMap(null); }.bind(this)); -
解析交互参数,添加事件监听
`` this.interactions.forEach( /** * @param {import("./interaction/Interaction.js").default} interaction Interaction. * @this {PluggableMap} */ function(interaction) { interaction.setMap(this); }.bind(this)); this.interactions.addEventListener(CollectionEventType.ADD, /** * @param {import("./Collection.js").CollectionEvent} event CollectionEvent. */ function(event) { event.element.setMap(this); }.bind(this)); this.interactions.addEventListener(CollectionEventType.REMOVE, /** * @param {import("./Collection.js").CollectionEvent} event CollectionEvent. */ function(event) { event.element.setMap(null); }.bind(this)); -
解析叠加层,添加事件监听
this.overlays_.forEach(this.addOverlayInternal_.bind(this)); this.overlays_.addEventListener(CollectionEventType.ADD, /** * @param {import("./Collection.js").CollectionEvent} event CollectionEvent. */ function(event) { this.addOverlayInternal_(/** @type {import("./Overlay.js").default} */ (event.element)); }.bind(this)); this.overlays_.addEventListener(CollectionEventType.REMOVE, /** * @param {import("./Collection.js").CollectionEvent} event CollectionEvent. */ function(event) { const overlay = /** @type {import("./Overlay.js").default} */ (event.element); const id = overlay.getId(); if (id !== undefined) { delete this.overlayIdIndex_[id.toString()]; } event.element.setMap(null); }.bind(this)); -
因为layer、target和view是构建map的必备要素,所以一定会触发
handleLayerGroupChanged_、handleTargetChanged_和handleViewChanged_事件,从而执行this.render()函数,最后执行渲染的主函数renderFrame_()。handleLayerGroupChanged_() { console.log("handleLayerGroupChanged_") if (this.layerGroupPropertyListenerKeys_) { this.layerGroupPropertyListenerKeys_.forEach(unlistenByKey); this.layerGroupPropertyListenerKeys_ = null; } const layerGroup = this.getLayerGroup(); if (layerGroup) { this.layerGroupPropertyListenerKeys_ = [ listen( layerGroup, ObjectEventType.PROPERTYCHANGE, this.render, this), listen( layerGroup, EventType.CHANGE, this.render, this) ]; } this.render(); } render() { console.log("render"); if (this.renderer_ && this.animationDelayKey_ === undefined) { this.animationDelayKey_ = requestAnimationFrame(this.animationDelay_); } } this.animationDelay_ = function() { console.log("animationDelay_") this.animationDelayKey_ = undefined; this.renderFrame_(Date.now()); }.bind(this); renderFrame_(time) { console.log("renderFrame_") const size = this.getSize(); const view = this.getView(); const previousFrameState = this.frameState_; /** @type {?FrameState} */ let frameState = null; if (size !== undefined && hasArea(size) && view && view.isDef()) { const viewHints = view.getHints(this.frameState_ ? this.frameState_.viewHints : undefined); const viewState = view.getState(); frameState = { animate: false, coordinateToPixelTransform: this.coordinateToPixelTransform_, declutterItems: previousFrameState ? previousFrameState.declutterItems : [], extent: getForViewAndSize(viewState.center, viewState.resolution, viewState.rotation, size), index: this.frameIndex_++, layerIndex: 0, layerStatesArray: this.getLayerGroup().getLayerStatesArray(), pixelRatio: this.pixelRatio_, pixelToCoordinateTransform: this.pixelToCoordinateTransform_, postRenderFunctions: [], size: size, tileQueue: this.tileQueue_, time: time, usedTiles: {}, viewState: viewState, viewHints: viewHints, wantedTiles: {} }; } this.frameState_ = frameState; this.renderer_.renderFrame(frameState); if (frameState) { if (frameState.animate) { this.render(); } Array.prototype.push.apply(this.postRenderFunctions_, frameState.postRenderFunctions); if (previousFrameState) { const moveStart = !this.previousExtent_ || (!isEmpty(this.previousExtent_) && !equals(frameState.extent, this.previousExtent_)); if (moveStart) { this.dispatchEvent( new MapEvent(MapEventType.MOVESTART, this, previousFrameState)); this.previousExtent_ = createOrUpdateEmpty(this.previousExtent_); } } const idle = this.previousExtent_ && !frameState.viewHints[ViewHint.ANIMATING] && !frameState.viewHints[ViewHint.INTERACTING] && !equals(frameState.extent, this.previousExtent_); if (idle) { this.dispatchEvent(new MapEvent(MapEventType.MOVEEND, this, frameState)); clone(frameState.extent, this.previousExtent_); } } //派发图层渲染的postrender事件 this.dispatchEvent(new MapEvent(MapEventType.POSTRENDER, this, frameState)); this.postRenderTimeoutHandle_ = setTimeout(this.handlePostRender.bind(this), 0); } /** * @protected */ handlePostRender() { console.log("handlePostRender"); const frameState = this.frameState_; // Manage the tile queue // Image loads are expensive and a limited resource, so try to use them // efficiently: // * When the view is static we allow a large number of parallel tile loads // to complete the frame as quickly as possible. // * When animating or interacting, image loads can cause janks, so we reduce // the maximum number of loads per frame and limit the number of parallel // tile loads to remain reactive to view changes and to reduce the chance of // loading tiles that will quickly disappear from view. const tileQueue = this.tileQueue_; if (!tileQueue.isEmpty()) { let maxTotalLoading = this.maxTilesLoading_; let maxNewLoads = maxTotalLoading; if (frameState) { const hints = frameState.viewHints; if (hints[ViewHint.ANIMATING] || hints[ViewHint.INTERACTING]) { const lowOnFrameBudget = !IMAGE_DECODE && Date.now() - frameState.time > 8; maxTotalLoading = lowOnFrameBudget ? 0 : 8; maxNewLoads = lowOnFrameBudget ? 0 : 2; } } if (tileQueue.getTilesLoading() < maxTotalLoading) { tileQueue.reprioritize(); // FIXME only call if view has changed tileQueue.loadMoreTiles(maxTotalLoading, maxNewLoads); } } if (frameState && this.hasListener(RenderEventType.RENDERCOMPLETE) && !frameState.animate && !this.tileQueue_.getTilesLoading() && !this.getLoading()) { //派发图层渲染的rendercomplete事件 this.renderer_.dispatchRenderEvent(RenderEventType.RENDERCOMPLETE, frameState); } const postRenderFunctions = this.postRenderFunctions_; for (let i = 0, ii = postRenderFunctions.length; i < ii; ++i) { postRenderFunctions[i](this, frameState); } postRenderFunctions.length = 0; }
参考文章
[1] Openlayers源码阅读 https://blog.csdn.net/u013240519/article/details/104997512